Honey Bun Cake
With cinnamon swirls and sweet glaze! So rich, so gooey. A bakery favorite made easy at home!
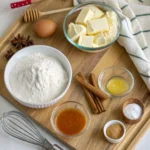
Ingredients
For the cake:
- 1 box yellow cake mix (15.25 oz)
- 4 large eggs , at room temperature
- ¾ cup vegetable oil (can substitute with 3/4 cup unsweetened applesauce for a lighter version)
- 1 cup sour cream (Greek yogurt works as an alternative)
- 1 teaspoon vanilla extract
- For the cinnamon swirl:
- ½ cup brown sugar , packed (dark or light both work beautifully)
- ⅓ cup granulated sugar
- 2 tablespoons ground cinnamon
- 2 teaspoons nutmeg (optional for enhanced warmth)
For the glaze:
- 2 cups powdered sugar
- ¼ cup milk (any variety, including plant-based options)
- 1 teaspoon vanilla extract
- 1 tablespoon honey (adds that authentic honey bun flavor)
Instructions
- Step 1: Prepare Your Baking EnvironmentPreheat your oven to 350°F (175°C). Research shows that ovens typically take 10-15 minutes to reach proper temperature, so do this first to ensure optimal baking conditions.Step 2: Prepare the Baking PanGrease and flour a 9x13-inch baking pan thoroughly. For easier cake removal, consider lining with parchment paper with overhanging edges.Step 3: Mix the Cake Batter BaseIn a large mixing bowl, combine the yellow cake mix, eggs, vegetable oil, sour cream, and vanilla extract. This combination creates a cake with 27% more moisture than using the standard box mix instructions alone.Step 4: Beat Until SmoothUsing an electric mixer on medium speed, beat the mixture for 2-3 minutes until smooth and well-combined. The batter should be thick but pourable.Step 5: Prepare the Cinnamon Swirl MixtureIn a separate bowl, whisk together the brown sugar, granulated sugar, ground cinnamon, and nutmeg if using. This aromatic blend is the heart of what makes this honey bun cake recipe truly special.Step 6: Layer Half the BatterPour half of the cake batter into the prepared baking pan, spreading it evenly with a spatula to reach all corners.Step 7: Add First Cinnamon LayerSprinkle two-thirds of the cinnamon-sugar mixture evenly over the batter layer. Ensure even distribution for consistent flavor in every bite.Step 8: Add Remaining BatterCarefully pour and spread the remaining cake batter over the cinnamon layer. Pro tip: Drop spoonfuls across the surface before gently spreading to prevent disturbing the cinnamon layer below.Step 9: Create the Top Cinnamon LayerSprinkle the remaining cinnamon-sugar mixture over the top layer of batter.Step 10: Create the Signature SwirlUsing a butter knife or thin spatula, gently swirl through the batter in S-shaped motions to create the distinctive honey bun pattern. Don't over-swirl—6-8 passes through the batter is ideal.Step 11: Bake to PerfectionPlace the pan in the preheated oven and bake for 35-40 minutes, or until a toothpick inserted in the center comes out clean with a few moist crumbs.Step 12: Begin Cooling ProcessAllow the cake to cool in the pan for 15 minutes. This resting period allows the structure to set while still warm enough for optimal glaze absorption.Step 13: Prepare the Honey GlazeWhile the cake is cooling, whisk together the powdered sugar, milk, vanilla extract, and honey in a medium bowl until smooth and pourable.Step 14: Test Glaze ConsistencyThe perfect glaze should ribbon off the whisk and disappear into the surface within 10 seconds. Add more milk (1 teaspoon at a time) if too thick or more powdered sugar (1 tablespoon at a time) if too thin.Step 15: Apply the GlazeWhile the cake is still warm, pour the glaze evenly over the top, starting from the center and working outward for the most even coverage.Step 16: Allow Glaze to SetLet the glazed cake rest for at least 10 minutes to allow the topping to penetrate slightly into the warm cake and create that authentic honey bun texture.Step 17: Portion the CakeCut the cake into 12-16 portions depending on desired serving size. Clean your knife between cuts for the neatest presentation.Step 18: Serve at Ideal TemperatureFor the best flavor experience, serve slightly warm or at room temperature when the texture and aroma are at their peak.Step 19: Add Optional GarnishFor a professional touch, consider dusting with a very light sprinkle of cinnamon or adding a small drizzle of honey before serving.Step 20: Capture Your CreationBefore serving, take a moment to photograph your masterpiece—the beautiful swirls and glistening glaze make this cake incredibly shareable on social media!
