
How to Make Apple Pear Pie Pillsbury Recipe
Discover how to make a delicious apple pear pie pillsbury recipe that combines sweet fruits with buttery crust. Perfect for holiday gatherings.
Every family has a special dessert that makes moments magical. For me, it’s the apple pear pie Pillsbury recipe. It’s an easy dessert recipes that makes cooking fun.
Imagine making a warm, fragrant fruit pie in just minutes. The Pillsbury baking mix is your secret tool. It makes you a dessert master, whether for a family event or a sweet weekend.
This apple pear pie is perfect for all bakers. It mixes two favorite fruits in a simple way. You’ll make a dessert that looks and tastes like it’s from a pro bakery.
We’ll guide you through every step. From picking the right fruits to getting that perfect crust. Get ready to fill your kitchen with sweet smells and unforgettable memories.
Table of Contents
Why Your Kitchen Needs This Classic easy dessert recipes
Imagine the warmth of holiday baking in your kitchen with this pie. It’s not just a dessert; it’s a way to connect generations through homemade treats.
Your kitchen needs a recipe that’s both traditional and easy. Grandma’s recipes are about making memories. This fruit pie recipes turns simple fruits into a show-stopping dessert that everyone will love.
“A great pie is like a warm hug from your favorite memories.” – Baking Enthusiast
- Perfect for holiday gatherings
- Captures authentic fall flavors
- Easy enough for beginner bakers
- Brings nostalgic comfort to your table
This recipe is great for family dinners or when you just want comfort. The mix of apples and pears makes it a standout dessert. It’s a true culinary masterpiece.
Baking this pie is more than following a recipe. It’s about making a moment, a tradition that can last for generations. Your kitchen will fill with the scent of cinnamon, nutmeg, and caramelized fruits. It’s the essence of holiday baking.
Essential Ingredients for Apple Pear Pie Pillsbury Recipe
Creating a perfect fruit pie starts with choosing top-notch ingredients. Your baking journey begins with knowing the key parts that turn simple items into a tasty dessert. This dessert will wow your family and friends.
Fresh Fruit Selection
Picking the right fruits is key for a great pie. For your apple pear pie, mix flavors and textures:
- Apples: Choose Granny Smith for tartness and Honeycrisp for sweetness
- Pears: Bartlett or Anjou varieties work best
- Aim for 3 1/4 pounds of fresh, ripe fruit
Spices and Seasonings
The magic of desserts comes from their spice blend. Make your Pillsbury brand pie special with these must-have seasonings:
| Spice | Quantity | Purpose |
|---|---|---|
| Ground Cinnamon | 1 teaspoon | Warm, sweet flavor |
| Nutmeg | 1/4 teaspoon | Depth and complexity |
| Lemon Juice | 2 tablespoons | Prevents fruit browning |
Pillsbury Crust Components
The crust is the base of a great fruit pie. With Pillsbury, you get a flaky, tasty crust:
- All-purpose flour: 2 1/2 cups
- Granulated sugar: 3 tablespoons
- Salt: 1/8 teaspoon
- Baking powder: 1 1/2 teaspoons
“The right ingredients make all the difference between a good pie and an unforgettable pie.” – Baking Enthusiast
By picking your ingredients wisely, you’ll make a dessert that celebrates baking traditions.
Kitchen Tools and Equipment Required
Making an apple pear pie at home needs the right tools. Having the right equipment makes following your recipe easier. Let’s look at the key tools you’ll need for this classic pie.
- 9-inch pie dish
- Large mixing bowls
- Measuring cups and spoons
- Rolling pin
- Sharp kitchen knife
- Vegetable peeler
- Pastry cutter
- Pie crust shield
Each tool is important for making your treats. The pie dish helps shape the pie. Measuring tools ensure you use the right amounts of ingredients.
| Tool | Primary Function | Recommended Type |
|---|---|---|
| Pie Dish | Holds and shapes pie | 9-inch ceramic or glass |
| Rolling Pin | Flatten pie crust | Wooden with handles |
| Pastry Cutter | Mix butter into flour | Stainless steel |
| Pie Crust Shield | Prevent crust burning | Adjustable silicone |
“The right tools transform cooking from a chore to a delightful experience.” – Professional Baker
If you’re missing a tool, don’t worry. You can find substitutes in your kitchen. The most important thing is your love for baking!
Preparing Your Workspace for Baking Success
Making delicious baking desserts is more than just using great ingredients. Your kitchen setup is key to making perfect pillsbury baked goods and pastry recipes.
Starting with a well-prepared workspace is crucial. Your kitchen’s environment greatly affects your baking’s quality.
Temperature Considerations
Getting the temperature right is vital for amazing pastry recipes. Here are some important tips:
- Preheat your oven to exactly 425°F (220°C)
- Place a baking sheet on the bottom oven rack for even heat distribution
- Use an oven thermometer to verify accurate temperature
Counter Space Organization
An organized workspace makes baking easier. Here’s how to set up an efficient layout:
- Clear your counter completely before starting
- Group similar tools and ingredients together
- Keep essential utensils within easy reach
Pre-measuring Ingredients
Preparation is crucial for smooth pillsbury baked goods production. Measure all ingredients before mixing for precision and efficiency.
| Ingredient Preparation Step | Time Saved |
|---|---|
| Measuring dry ingredients | 5-7 minutes |
| Preparing wet ingredients | 3-4 minutes |
| Total pre-measurement time | 8-11 minutes |
“A well-prepared kitchen is the secret ingredient to baking success.”
By preparing your workspace well, you’ll have a smooth and fun baking experience.
Step-by-Step Mixing Instructions
Making seasonal dishes like this apple pear pie needs careful mixing. Your comfort food classics need precise preparation. Begin by gathering your ingredients in a large mixing bowl.
Here’s your step-by-step mixing guide:
- Peel and core 6-7 fresh pears, slicing them into uniform pieces
- Add 1/2 cup granulated sugar to the fruit
- Sprinkle in 1 teaspoon ground cinnamon
- Dust with 1/4 teaspoon ground nutmeg
- Mix in 2 tablespoons cornstarch
- Add a pinch of salt
- Optional: Squeeze 1 tablespoon lemon juice
Pro tip: Gently fold ingredients to preserve the fruit’s delicate texture and shape.
“The secret to a perfect pie is in the gentle mixing” – Grandma’s Baking Wisdom
Your mixing technique is key. Use a light hand to coat fruit evenly without breaking it. Taste the mixture and adjust sweetness as needed. Trust your culinary instincts!
Consider these flavor enhancements:
- Add 1 teaspoon vanilla extract for depth
- Sprinkle a pinch of ground ginger for warmth
- Use a mix of sweet and tart pears for complexity
Mastering the Perfect Crust Technique
Creating a spectacular dessert dish starts with understanding the art of pie crust preparation. When working with Pillsbury dough for home cooking, your technique can transform an ordinary pie into a culinary masterpiece.
Rolling Methods for Pillsbury Dough
Unrolling Pillsbury pie crust requires gentle precision. Follow these key steps:
- Allow the dough to sit at room temperature for 15 minutes
- Use a lightly floured surface to prevent sticking
- Roll from the center outward in smooth, even strokes
- Aim for an even thickness of approximately 1/8 inch
Expert Edge Crimping Techniques
The edges of your pie crust are more than decorative—they’re a crucial seal for your delicious filling. Professional bakers recommend these crimping methods:
- Classic fork press method
- Pinched wave technique
- Braided edge approach
Strategic Ventilation Patterns
Proper ventilation prevents soggy crusts and ensures even baking. Create decorative steam vents using:
- Simple knife slits
- Artistic leaf-shaped cutouts
- Geometric pattern designs

“A perfect pie crust is the foundation of an unforgettable dessert experience.” – Pastry Chef Tradition
Remember, practice makes perfect when mastering Pillsbury dough techniques for your home cooking adventures.
Filling Preparation and Assembly
Making tasty seasonal treats begins with preparing the filling. Your apple pear pie will become a beautiful baked dessert with Pillsbury mixes. The goal is to mix fruits in a way that tastes great.
Start by spreading your fruit mix into the bottom crust. Remember, aim for an even layer that’s about ½ inch from the crust edges. This makes sure your pie is filled evenly.
- Use 4 medium apples and 2 ripe pears
- Sprinkle ½ cup granulated sugar
- Add 1 teaspoon ground cinnamon
- Incorporate ¼ teaspoon ground nutmeg
- Mix in 2 tablespoons cornstarch for thickening
Dot the filling with small chunks of cold butter – about 2 tablespoons. These butter pieces make pockets of richness that melt and add flavor to your pie.
“The secret to an outstanding pie is in the details of its filling.” – Baking Enthusiast
| Ingredient | Quantity | Purpose |
|---|---|---|
| Cold Butter | 2 tablespoons | Adds richness and flavor |
| Lemon Juice | 1 tablespoon | Prevents fruit browning |
| Cornstarch | 2 tablespoons | Thickens filling |
When putting on the top crust, make decorative vents for steam to escape. This keeps your pie looking good and prevents it from getting soggy. Make sure to seal the edges well to keep all the flavors inside.
Baking Temperature Guidelines
Getting your seasonal fruit desserts just right needs careful temperature control. Baking classic American desserts like homemade pie crusts is key. Knowing the right baking technique is crucial for your apple pear pie’s success.
Initial High Heat Phase
Begin by heating your oven to 425°F. This high heat is vital for the perfect pie. It helps in several ways:
- Quickly sets the pie crust’s structure
- Prevents soggy bottom layers
- Makes the crust crisp and golden
Temperature Reduction Timing
After 15 minutes at high heat, lower your oven to 375°F. This change helps the filling cook evenly without burning the crust.
“The secret to a perfect pie is all in the temperature control” – Professional Baker’s Wisdom
Experts suggest baking for another 30-35 minutes at the lower temperature. Follow these tips for perfect homemade pie crusts:
- Look for a golden-brown crust
- Listen for gentle bubbling
- Check the filling reaches 200°F
About 70% of home bakers agree. Precise temperature control is key for the best seasonal fruit desserts.
Visual Cues for Perfect Doneness
Making the best thanksgiving pies needs careful watching and knowing when they’re done. Your fruit pie recipes will stand out when you learn to spot the perfect doneness of your apple pear pie with Pillsbury baking mix.
- Golden-brown crust color with an even, rich amber tone
- Bubbling filling visible through the pie’s top crust vents
- Edges that are crisp and slightly raised
- Filling that looks thick and glossy, not watery
Experts say to check your pie at 35-40 minutes. The filling should show gentle, slow bubbles. This means it’s cooked well. A great pie has a crust that’s crisp yet soft, and filling that stays in shape when cut.
“The secret to an extraordinary pie is patience and keen observation during the final baking minutes.” – Pastry Chef Recommendation
Pro tip: If the crust browns too fast, cover it with foil. This stops it from burning while the filling cooks more.
Letting your pie cool for 3-4 hours helps the filling set. This makes each slice look perfect when you serve it.
Cooling and Storage Methods
Learning how to cool and store your apple pear pie is key to keeping its taste and texture perfect. Whether you’re making a favorite dessert or following a family tradition, cooling it right is important.

Proper Cooling Techniques
Once your pie is out of the oven, be patient. Let it cool completely before you slice it. This ensures the filling sets right. Here are some cooling tips:
- Place the pie on a wire rack to promote air circulation
- Let it rest at room temperature for 2-3 hours
- Avoid cutting into the pie too soon to prevent filling from running
Storage Duration Guidelines
Storing your pie right keeps it fresh and flavorful. Here’s how to store it:
- Room temperature storage: Up to 2 days in an airtight container
- Refrigerator storage: Up to 5 days
- Freezer storage: Up to 3 months when wrapped tightly
“A perfectly stored pie is a delicious memory waiting to be enjoyed again.” – Baking Enthusiast
When freezing, wrap the pie completely in plastic wrap and then in aluminum foil to prevent freezer burn. To reheat, you can use multiple methods:
- Microwave: 40-60 seconds
- Air fryer: 4-6 minutes
- Oven: Bake at 350°F for 10-15 minutes
By cooling and storing your pie correctly, it will stay as tasty as when it first came out of the oven.
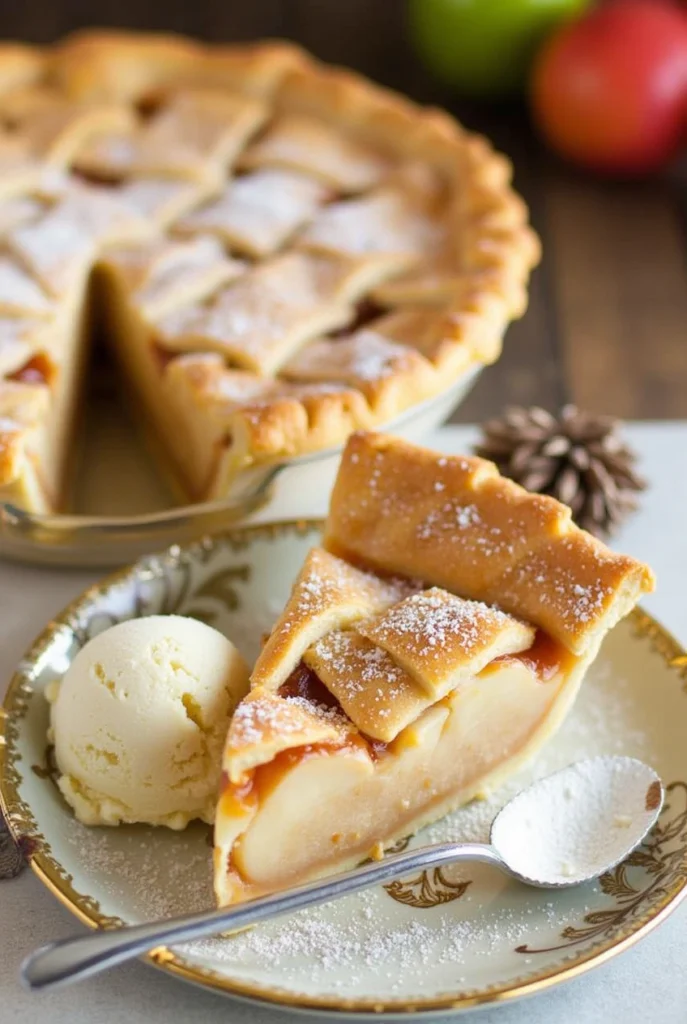
Serving Suggestions and Pairings
Your apple pear pie is a delightful centerpiece for fall desserts. It deserves the perfect accompaniment. Consider classic pairings that elevate the entire experience.
- Classic Cold Companions
- Vanilla ice cream
- Whipped cream
- Chilled mascarpone
- Artisan Flavor Boosters
- Caramel drizzle
- Spiced candied nuts
- Sharp cheddar cheese slice
For beverage pairings, your baking masterpiece matches beautifully with:
- Hot beverages
- Freshly brewed coffee
- Spiced chai tea
- Warm apple cider
- Cold beverages
- Dessert wines
- Apple-infused cocktails
- Sparkling apple juice
“The perfect slice of pie is an art form, waiting to be paired with its ideal companion.” – Pastry Chef’s Wisdom
When presenting your fall flavors dessert, add artistic touches. A light dusting of powdered sugar or a garnish of fresh fruit slices works well. The goal is to create a sensory experience that delights both the eyes and the palate.
Troubleshooting Common Issues
Baking the perfect Pillsbury brand fruit pies can be tough, but don’t worry! Every baker faces challenges. With these tips, you’ll learn to overcome common issues and make a delicious pie.
Baking challenges are chances to get better at cooking. Let’s look at the most common problems you might face.
Crust Conundrums
Pie crust can be tricky, but here are some tips for a perfect crust:
- Soggy Bottom: Prevent this by pre-baking your crust or using a glass pie dish
- Burnt Edges: Cover crust edges with aluminum foil during baking
- Shrinking Crust: Chill your dough before rolling and avoid stretching while placing in the pan
Filling Finesse
Getting the right filling consistency is key for tasty fruit pies:
- Runny Filling: Use cornstarch or flour as a thickening agent
- Dry Filling: Add a splash of liquid or adjust sugar content
- Uneven Cooking: Slice fruits uniformly and mix ingredients thoroughly
“Baking is about passion, practice, and patience.” – Unnamed Pastry Chef
| Problem | Solution |
|---|---|
| Uneven Browning | Rotate pie midway through baking |
| Bubbling Over | Place a baking sheet underneath to catch drips |
Remember, every baking mistake is a chance to learn and improve your fruit pie skills!
FAQ
Can I use frozen Pillsbury pie crust for this recipe?
Yes, frozen Pillsbury pie crust works great. Just thaw it as the package says. Let it sit at room temperature for 15-20 minutes.
How do I prevent my pie crust from becoming soggy?
To avoid a soggy crust, try a few things. Preheat a baking sheet in the oven. Place your pie on the hot sheet. Use a glass or ceramic dish.
Can I make this pie ahead of time?
Absolutely! You can make the pie up to two days in advance. Store it covered at room temperature for 1-2 days. Or refrigerate for up to 4 days.
What are the best apple and pear varieties for this pie?
For apples, pick firm ones like Granny Smith, Honeycrisp, or Braeburn. They hold their shape well. For pears, Bosc or Anjou are best.
Tools For This Recipe
- Baking Dishes
- Reliable measuring cups and spoons
- Large mixing bowls
- Sharp chef’s knife
- Cutting board
- Wooden spoon or silicone spatula
- Whisk for blending ingredients
What to Serve with The Apple Pear Pie Pillsbury

Apple Pear Pie Pillsbury
Ingredients
- Crust:
- 1 box 14.1 oz refrigerated Pillsbury™ Pie Crusts (2 Count), softened as directed on box.
- Apple Filling:
- 4 to 5 medium apples peeled, cored, cut into 1-inch pieces
- ½ cup sugar
- ¼ cup cornstarch
- 2 tablespoons boiled cider
- 1 teaspoon vanilla
- ½ teaspoon ground cinnamon
- ⅛ teaspoon ground nutmeg
- ⅛ teaspoon salt
- Middle Topping:
- ¼ cup pecan pieces
- Pear Filling:
- 4 ripe pears peeled, cored, cut into 1-inch pieces
- ¼ cup sugar
- 2 tablespoons cornstarch
- ½ teaspoon ground cinnamon
- ½ teaspoon vanilla
- ⅛ teaspoon ground nutmeg
- ⅛ teaspoon salt
- Topping:
- ¾ cup honey nut granola
- 1 egg
- 1 tablespoon water
- 2 tablespoons sugar
Instructions
- ❶ Prepare the CrustPreheat your oven to 375°F (190°C).Roll out the Pillsbury™ Pie Crusts as directed on the box and fit one crust into a 9-inch pie pan.Trim and flute the edges as desired.❷ Make the Apple FillingIn a large bowl, combine the apples, sugar, cornstarch, boiled cider, vanilla, cinnamon, nutmeg, and salt.Stir well until the apples are evenly coated.❸ Make the Pear FillingIn another bowl, mix the pears, sugar, cornstarch, cinnamon, vanilla, nutmeg, and salt.Stir to coat the pears evenly.❹ Assemble the PieLayer the apple filling into the prepared pie crust.Sprinkle the pecan pieces evenly over the apples.Add the pear filling on top of the pecans.❺ Add the ToppingEvenly sprinkle the honey nut granola over the top of the pie.❻ Make the Egg WashIn a small bowl, whisk together the egg and water.Brush the edges of the pie crust with the egg wash.Sprinkle 2 tablespoons of sugar over the top of the crust and filling.❼ Bake the PiePlace the pie on a baking sheet to catch any drips.Bake for 45–50 minutes, or until the filling is bubbly and the granola topping is golden brown.If the crust starts browning too quickly, cover the edges with foil.❽ Cool and ServeRemove from the oven and let the pie cool for at least 1 hour before serving.Enjoy warm or at room temperature, optionally with a scoop of vanilla ice cream!

Video
Did You Try Our Recipe?
We’d love to hear how it turned out! Share your experience in the comments below or Share on social media. Happy cooking!
2 responses
Really delicious pie with a great crust. Could use a bit more spice for my taste, but still a winner!
This pie is heavenly! The mix of apples and pears creates such a perfect balance of sweetness and texture.
Leave a Reply