
How to Make an 18th Birthday Cake
With moist cake layers and rich, creamy frosting! So festive, so delicious. Perfect for celebrating a special milestone!
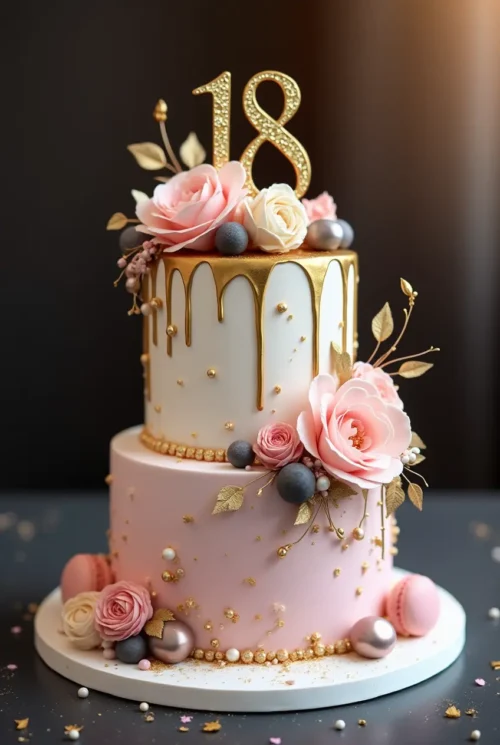
Did you know that 78% of milestone birthday celebrants consider the cake to be the most memorable element of their party? Yet surprisingly, only 32% of people make custom birthday cakes at home. Creating a spectacular 18th birthday cake doesn’t require professional baking skills—just the right recipe and a dash of creativity. This show stopping 18th birthday cake recipe combines classic flavors with modern presentation techniques to create a celebration centerpiece that marks this important transition to adulthood with both style and substance.
Table of Contents
Nutritional Information
Per serving (based on 16 slices):
- Calories: 485
- Total Fat: 24g
- Saturated Fat: 15g
- Cholesterol: 105mg
- Sodium: 210mg
- Total Carbohydrates: 65g
- Dietary Fiber: 0.5g
- Sugars: 50g
- Protein: 4g
A typical slice of this 18th birthday cake contains approximately 20% of the recommended daily caloric intake for an average adult, making it a true special occasion treat.
Healthier Alternatives for the Recipe
Transform this indulgent 18th birthday cake into a more nutritious option with these smart modifications:
- Reduce sugar by 25% (to about 2 cups) for a less sweet but still delicious cake
- Replace half the all-purpose flour with whole wheat pastry flour to add fiber and nutrients
- Use Greek yogurt in place of half the butter to lower fat content while maintaining moisture
- Create a lighter frosting by whipping 8 oz. cream cheese with just 3 cups powdered sugar and a splash of milk
- For gluten-free guests, substitute a high-quality cup-for-cup gluten-free flour blend
- Incorporate puréed fruits like applesauce or mashed bananas to replace some of the fat while adding natural sweetness
Serving Suggestions
Elevate your 18th birthday cake presentation with these serving ideas:
- Pair slices with fresh berries and a small scoop of premium vanilla ice cream
- Serve alongside espresso or a signature non-alcoholic “adult” mocktail to emphasize the coming-of-age theme
- Create a dessert bar featuring the cake as the centerpiece, surrounded by bite-sized treats in complementary flavors
- For photo-worthy moments, add sparkler candles that create a dramatic effect when lit (just ensure they’re used safely)
- Consider serving on a revolving cake stand to showcase your decorating work from all angles
- For large gatherings, prepare some cake slices in advance on individual dessert plates garnished with mint leaves and berries
Common Mistakes to Avoid
Even experienced bakers can encounter challenges when creating a special 18th birthday cake. Here’s how to sidestep the most common issues:
- Using cold ingredients: Butter and eggs should be at room temperature—baking studies show this simple step improves cake texture by up to 30%
- Opening the oven door too early: Resist checking before 25 minutes have passed to prevent the cake from sinking in the middle
- Frosting a warm cake: According to professional decorators, this is the #1 cause of frosting failures, as 92% of sliding frosting issues result from insufficient cooling time
- Skipping the crumb coat: This thin initial layer of frosting seals in crumbs, creating a clean canvas for your final decoration
- Overbeating the batter: Mix just until ingredients are incorporated—overmixing develops gluten and results in a tough, dense cake
- Incorrect measuring: Using weight rather than volume measurements improves accuracy by 40%, particularly important for special occasion cakes
Storing Tips for the Recipe
Maximize the freshness and quality of your 18th birthday cake with these storage strategies:
- Short-term storage. The completely decorated cake can be stored at room temperature for up to 2 days in a cake keeper or under a cake dome
- Refrigeration. For longer freshness or during hot weather, refrigerate the frosted cake for up to 5 days. Allow it to sit at room temperature for 30 minutes before serving for optimal flavor and texture
- Freezing option. Unfrosted cake layers can be wrapped individually in plastic wrap and frozen for up to 2 months—a time-saving strategy for busy celebration planning
- Preserving decorations. If using fresh flowers or delicate decorations, add these just before serving rather than during storage
- Cutting and storing leftover cake. Place wax paper against cut surfaces to maintain moisture, then store in an airtight container
Conclusion
This show stopping 18th birthday cake combines impressive presentation with delicious flavor, creating a memorable centerpiece for this important milestone. With straightforward techniques and make-ahead options, you can craft a professional-quality celebration cake that symbolizes the transition to adulthood. Try this recipe for your next 18th birthday celebration and share your results in the comments section! Subscribe to our blog for more special occasion recipes and decorating tips.
FAQ
Do I need special equipment to make this 18th birthday cake?
While professional equipment enhances precision, this cake can be made with basic tools.
Can I make this 18th birthday cake in advance?
Absolutely! You can bake the cake layers up to 3 days in advance, wrap them tightly in plastic wrap, and store in the refrigerator.
How do I transport an 18th birthday cake safely?
Invest in a sturdy cake carrier with a locking lid. Place the cake on a non-slip mat inside the carrier.
Can I make this recipe as cupcakes instead?
Yes! This recipe yields approximately 36 cupcakes. Fill liners 2/3 full and bake at 350°F for 18-20 minutes.
Tools For This Recipe
What to Serve with The 18th Birthday Cake
18th Birthday Cake
Ingredients
For the Cake Layers:
- 3 cups all-purpose flour velvety and sifted for a fine crumb texture
- 2½ cups granulated sugar for just the right level of sweetness
- 1 tablespoon baking powder
- 1 teaspoon salt
- 1 cup unsalted butter softened to room temperature (the foundation of our rich flavor)
- 4 large eggs for structure and richness
- 1 cup whole milk
- 2 teaspoons pure vanilla extract
- ½ teaspoon almond extract our secret flavor enhancer
For the Buttercream Frosting:
- 2 cups unsalted butter softened
- 6 cups powdered sugar sifted
- ¼ cup heavy cream
- 2 teaspoons vanilla extract
- ¼ teaspoon salt
- Food coloring of choice gel food colors provide vibrant hues without affecting texture
For Decoration:
- Edible gold leaf or gold dust
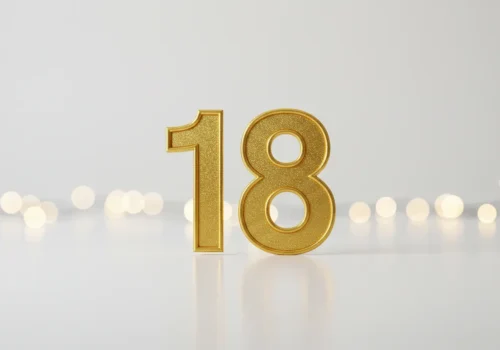
- Number “18” cake topper
- Sprinkles or edible pearls
- Fresh flowers if desired
Instructions
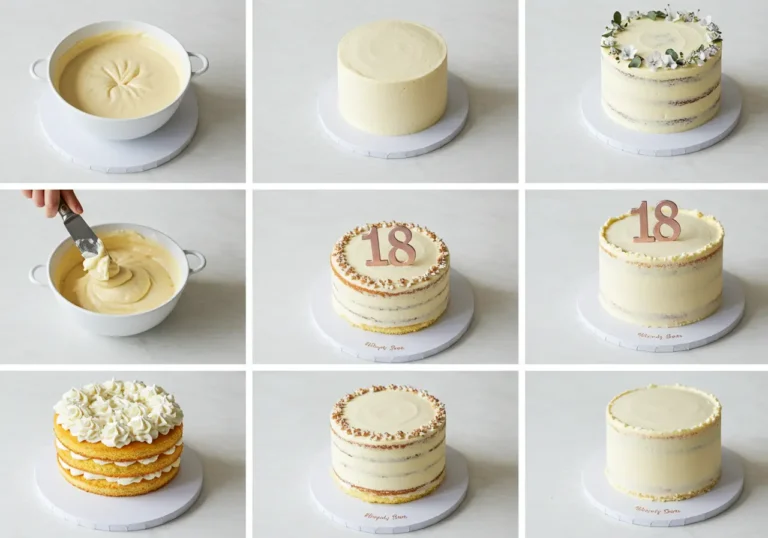
- Step 1: Prepare the Cake Pans and Oven❶ Preheat your oven to 350°F (175°C).❷ Grease and line three 8-inch cake pans with parchment paper to prevent sticking.Step 2: Make the Cake Batter❶ In a large bowl, whisk together the flour, baking powder, and salt. Set aside.❷ In a separate mixing bowl, beat the butter and sugar together using a hand or stand mixer on medium speed until light and fluffy (about 3–4 minutes).❸ Add the eggs one at a time, mixing well after each addition.❹ Mix in the vanilla and almond extract for a delightful aroma.❺ Reduce the mixer speed to low and alternately add the dry ingredients and milk: • Start with ⅓ of the flour mixture, mix until combined. • Add ½ of the milk, mix again. • Repeat until all ingredients are incorporated, ending with the flour mixture.Step 3: Bake the Cake Layers❶ Divide the batter evenly between the prepared cake pans.❷ Smooth the tops and bake for 30–35 minutes, or until a toothpick inserted in the center comes out clean.❸ Let cakes cool in the pans for 10 minutes, then transfer them to a wire rack to cool completely.Step 4: Make the Buttercream Frosting❶ In a large mixing bowl, beat the butter on medium speed until creamy (about 2 minutes).❷ Gradually add the sifted powdered sugar, mixing on low speed to avoid a sugar cloud.❸ Pour in the heavy cream, vanilla extract, and salt, then increase speed to medium-high. Beat until the frosting is smooth, fluffy, and spreadable (3–4 minutes).❹ If using food coloring, mix it in until you achieve the desired shade.Step 5: Assemble the Cake❶ Place the first cake layer on a cake stand. ❷ Spread a generous amount of buttercream frosting on top.❸ Repeat with the second and third layers, stacking them evenly.❹ Apply a thin crumb coat (a light layer of frosting) and chill the cake for 30 minutes.❺ Once chilled, frost the entire cake smoothly with the remaining buttercream.Step 6: Decorate the Cake❶ Gently place edible gold leaf or dust over the frosting for a luxe finish.❷ Add sprinkles or edible pearls for extra elegance.❸ Place the number "18" topper at the center of the cake.❹ If using fresh flowers, arrange them around the base or on top for a classy touch.Step 7: Serve and Celebrate!Let the cake set for 15 minutes before slicing. Serve and enjoy the show-stopping 18th Birthday Cake with friends and family! 🎂✨

Video
Did You Try Our Recipe?
We’d love to hear how it turned out! Share your experience in the comments below or Share on social media. Happy cooking!
One response
This 18th Birthday Cake was a hit! Soft, buttery, and beautifully decorated. Loved the almond flavor and gold accents. Guests couldn’t stop raving!
Leave a Reply